
GatsbyJSのコードブロックにコピーボタンを追加する
技術ブログを書く時、ソースコードの共有は一般的です。幸い、GatsbyJSを使えばすごく簡単に実現できます。gatsby-transformer-remarkとgatsby-remark-prismjsをインストールし、gatsby-config.jsのmodule.exportsに下記の設定を追加するだけで綺麗なコードブロックが作れます。
require("prismjs/themes/prism-solarizedlight.css")
module.exports = {
plugins: [
{
resolve: `gatsby-transformer-remark`,
options: {
plugins: [
`gatsby-remark-prismjs`,
],
},
},
]
}
しかし、gatsby-plugin-mdxと違い、コンポーネントの入れ替えはできないため、コードブロックにコピーボタンの追加は簡単にできません。ただ、gatsby-transformers-remarkで生成されるMarkdownASTを解析すれば、難しくなくコピーボタンを作れます。今日この方法を紹介します。
tl;dr
プラグインを作りました。作り方に興味がない方はこちらをご覧ください。
https://github.com/thundermiracle/gatsby-remark-prismjs-copy-button
ASTについて
ASTはAbstract Syntax Tree(抽象構文木)の略称です。簡単にいうと、人間が理解しやすいプログラムを機械が理解できるコードへコンパイルする前に、プログラムで処理しやすくするためのものとなります。コンパイルツールなどがAST層でプラグインを適用するのが多いです。よく使われるbabel、eslint、webpackが同じ仕組みを持っています。ASTに関しては以下のサイトを参考にしてください。
https://www.twilio.com/blog/abstract-syntax-trees
MarkdownASTについて
gatsby-transformer-remarkはmarkdownを使って書いたMarkdownをASTに変換してくれます。変更したASTの確認はオンラインでも簡単にできます。
`Markdownとremark`を選択したら、サンプルのMarkdownをASTへ変換してくれます。コードブロックにフォーカスすれば、コードブロックのASTが表示されます。
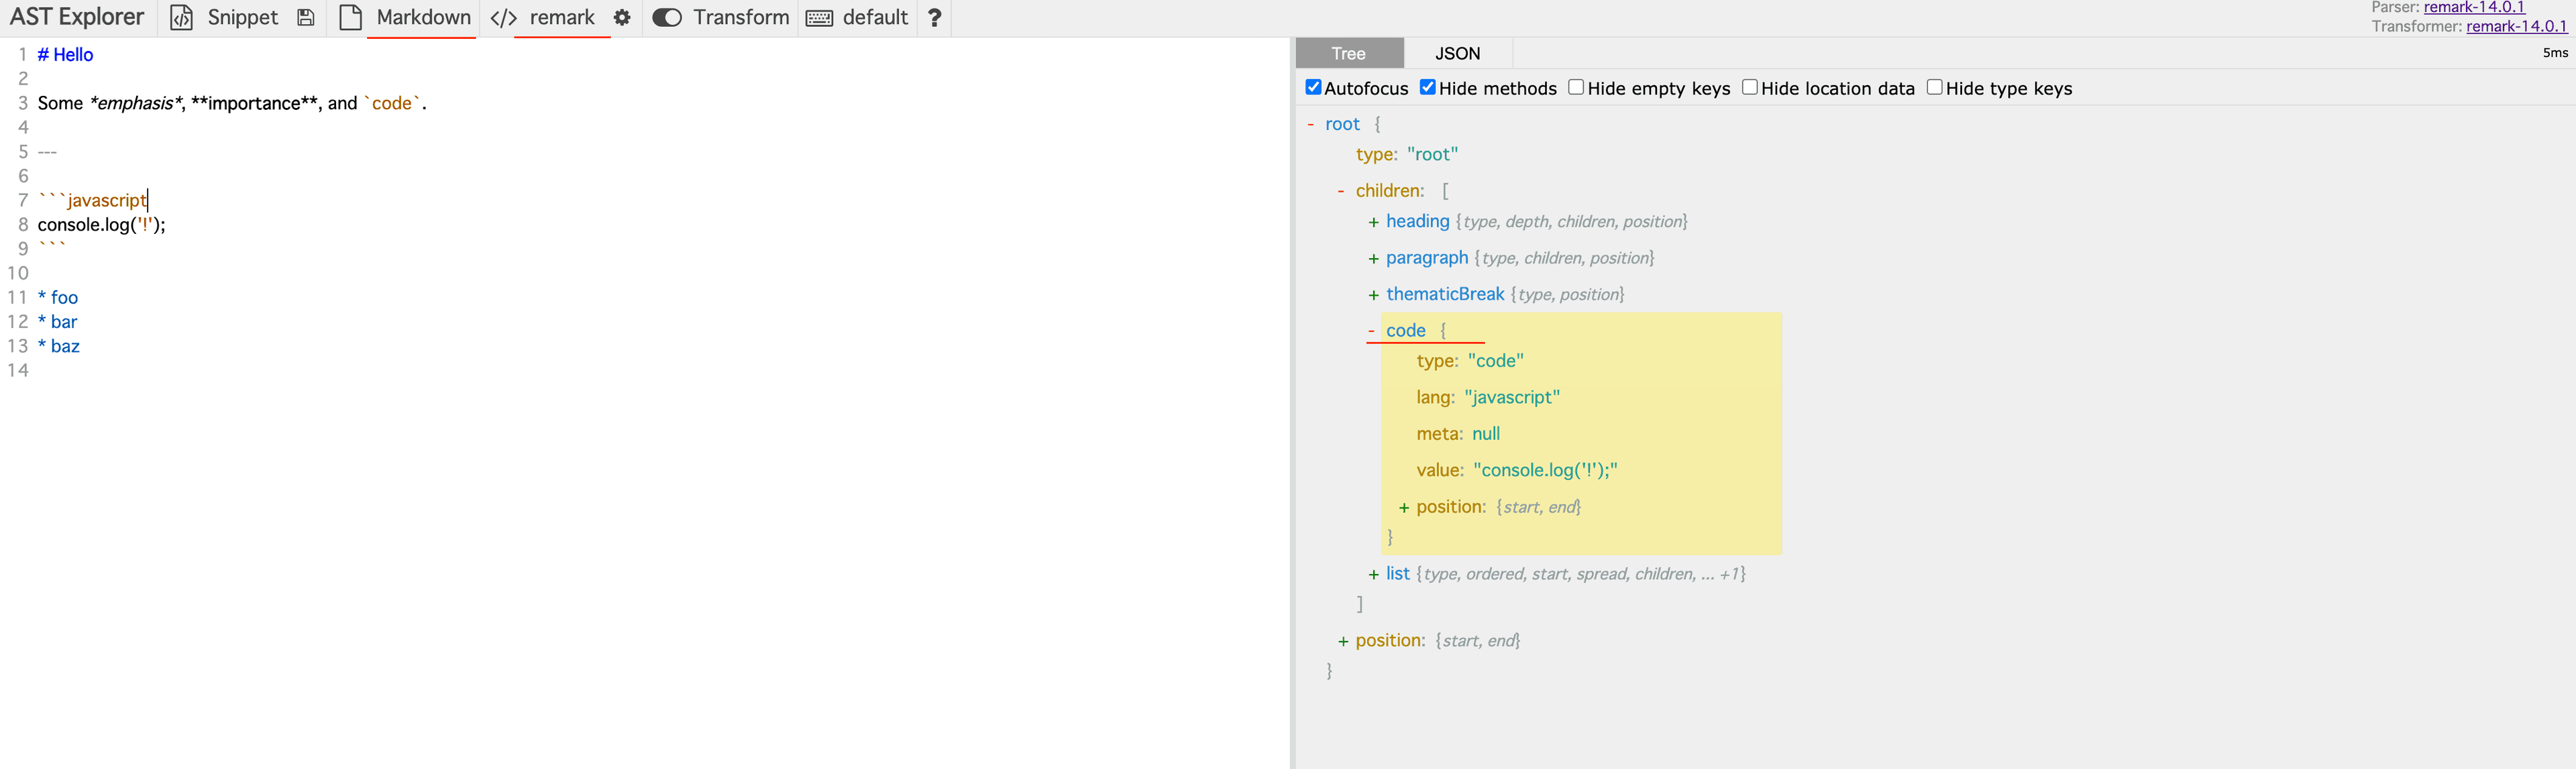
options中のpluginsがこちらのASTを参照して、htmlへ変換しています。例えば:gatsby-remark-prismjsがtype: "code"の全てのASTをコードブロックを表示用のhtmlに変換してくれます。上の添付イメージの部分のコードブロックのASTはこちらです(抜粋)。
{
"type": "code",
"lang": "js",
"value": "console.log('!');",
"meta": null
}
gatsby-remark-prismjsがこのASTを使って、下記のhtmlを生成してくれます。
<div class="gatsby-highlight" data-language="javascript">
<pre class="language-javascript">
<code class="language-javascript">
console
<span class="token punctuation">.</span>
<span class="token function">log</span>
<span class="token punctuation">(</span>
<span class="token string">'!'</span>
<span class="token punctuation">)</span>
<span class="token punctuation">;</span>
</code>
</pre>
</div>
コピーボタンの追加方法
では、コピーボタンをどう追加すればいいでしょうか。上の紹介の通り、コードブロックのASTはhtmlではないため、簡単にコピーボタンのhtmlを入れられません。だが、コピーボタンのhtml部分をtype: "html"のASTとしてコードブロックのASTの前に追加でき、cssを少し調整すればworkaroundとして実装できます。流れはこちらです。
- ASTsから全てのコードブロックのASTを取得する
- コードブロックの前に、コピーボタンのhtmlを追加する
- コピーボタンの位置をcssで調整する(
margin-top: -10pxなど) - コピーボタンのイベントを追加する
では、始めましょう。
ASTsから全てのコードブロックのASTを取得する
まず、プラグインのルートフォルダのindex.jsに全てのASTsを取得できます。
module.exports = function gatsbyRemarkPrismCopyButton({ markdownAST }) {
// output all ASTs
console.log(markdownAST);
}
そして、markdownASTの中にあるtype: "code"のASTを取得すればいいでしょう。今回はunist-util-visitというツールを使って簡単に絞り込めていきます。
module.exports = function gatsbyRemarkPrismCopyButton({ markdownAST }) {
visit(markdownAST, 'code', (node, index, parent) => {
}
}
コードブロックの前に、コピーボタンのhtmlを追加する
- コードブロックのコード部分を取得し、functionに渡せるようにする
let code = parent.children[index].value;
code = code.replace(/"/gm, '"').replace(/`/gm, '\\`').replace(/\$/gm, '\\$');
- htmlのASTを作成する
const buttonNode = {
type: 'html',
value: `
<div class="gatsby-remark-prismjs-copy-button-container">
<div class="gatsby-remark-prismjs-copy-button" tabindex="0" role="button" aria-pressed="false" onclick="gatsbyRemarkCopyToClipboard(\`${code}\`, this)">
Copy
</div>
</div>
`,
};
- ASTを追加する
parent.children.splice(index, 0, buttonNode);
- ASTの追加した後の調整
ASTを追加すると、次の(node, index, parent) => {}のnodeがまた処理済みのnodeとなりますので、そのままだっと無限ループになってしまいます。処理済みのフラグをnode.langへ追加して、スキップしましょう。
const COPY_BUTTON_ADDED = 'copy-button-added-';
// skip already added copy button
if (lang.startsWith(COPY_BUTTON_ADDED)) {
node.lang = lang.substring(COPY_BUTTON_ADDED.length);
return;
}
.
.
.
parent.children.splice(index, 0, buttonNode);
// add flag
node.lang = `${COPY_BUTTON_ADDED}${lang}`;
- まとめ
整理すると、以下のようになります。
const visit = require('unist-util-visit');
const COPY_BUTTON_ADDED = 'copy-button-added-';
module.exports = function gatsbyRemarkCopyButton(
{ markdownAST },
) {
visit(markdownAST, 'code', (node, index, parent) => {
const lang = node.lang || '';
if (lang.startsWith(COPY_BUTTON_ADDED)) {
node.lang = lang.substring(COPY_BUTTON_ADDED.length);
return;
}
let code = parent.children[index].value;
code = code.replace(/"/gm, '"').replace(/`/gm, '\\`').replace(/\$/gm, '\\$');
const buttonNode = {
type: 'html',
value: `
<div class="gatsby-remark-prismjs-copy-button-container">
<div class="gatsby-remark-prismjs-copy-button" tabindex="0" role="button" aria-pressed="false" onclick="gatsbyRemarkCopyToClipboard(\`${code}\`, this)">
Copy
</div>
</div>
`,
};
parent.children.splice(index, 0, buttonNode);
node.lang = `${COPY_BUTTON_ADDED}${lang}`;
});
return markdownAST;
};
コピーボタンの位置をcssで調整する
style.cssを作る
.gatsby-remark-prismjs-copy-button-container {
touch-action: none;
display: flex;
justify-content: flex-end;
position: relative;
top: 37px;
left: 8px;
margin-top: -28px;
z-index: 1;
pointer-events: none;
}
.gatsby-remark-prismjs-copy-button {
cursor: pointer;
pointer-events: initial;
font-size: 13px;
padding: 3px 5px 2px;
border-radius: 3px;
color: rgba(255, 255, 255, 0.88);
}
style.cssをimportする
require("./style.css");
コピーボタンのイベントを追加する
コピーボタンのhtml ASTを追加する時使っているgatsbyRemarkCopyToClipboardを追加しましょう。
exports.onClientEntry = () => {
window.gatsbyRemarkCopyToClipboard = (str, copyButtonDom) => {
// prevent multiple click
if (copyButtonDom.textContent === 'Copied') {
return;
}
// copy to clipboard
navigator.clipboard.writeText(str);
copyButtonDom.textContent = 'Copied!';
};
};
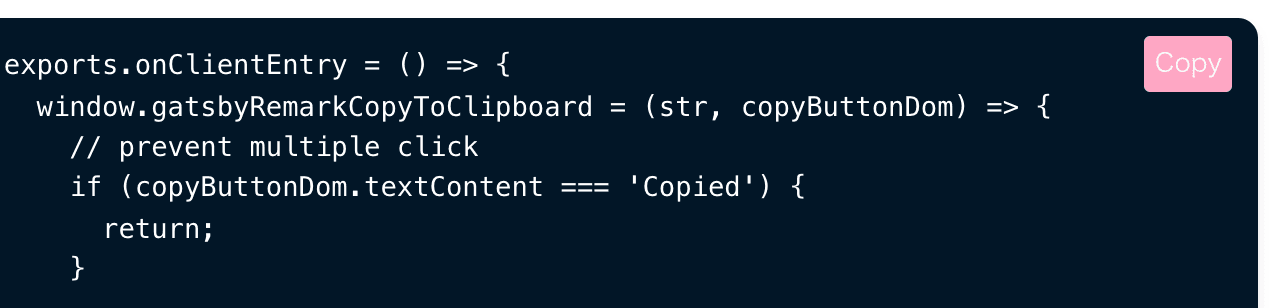
完了
追加したコピーボタンはこうなります。ご参考までに。
プラグインのレポジトリはこちら。
https://github.com/thundermiracle/gatsby-remark-prismjs-copy-button

Blog part of ThunderMiracle.com
コメントは表示領域に入ると読み込みます