Netlify Form is quite easy to build a contact form in serverless architecture like Gatsby. But the free plan only allows 100 submissions a month, so spam filter is really important at this point.( ´艸`)
It’s not hard to follow the instructions in Netlify’s form spam filter page to make a normal http post contact form. But it’s quite challenging to do this with ajax for landing page. Let’s try ajax way today.
What to do
Make a Netlify form in landing page with spam filters, like:
-
Honeypot field
-
reCAPTCHA 2
Honeypot field
What is Honeypot field? You can find some introductions HERE.
Adding netlify-honeypot to form prop is not necessary when post form data by ajax. We can do it simply by adding a hidden input to the contents of the form.
const [inputs, setInputs] = React.useState({});

const handleChange = React.useCallback(
  (event) => {
    setInputs({
      ...inputs,
      [event.target.name]: event.target.value,
    });
  },
  [inputs],
);

<form>
  <p hidden>    <label htmlFor="bot-field">      Don’t fill this out: <input name="bot-field" onChange={handleChange} />    </label>  </p>  <label>Email:<input type="text" name="email" onChange={handleChange} /></label>
</form>
reCAPTCHA v2
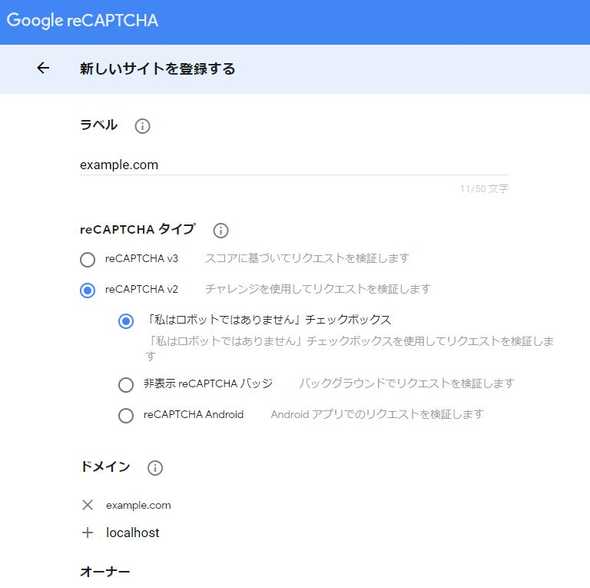
Get reCAPTCHA’s Key pair
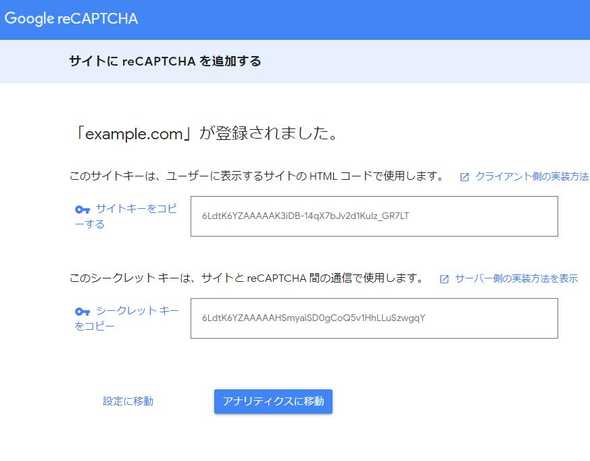
https://www.google.com/recaptcha/admin, reCAPTCHA v2’s site key and secret key.

Copy site keyとsecret key

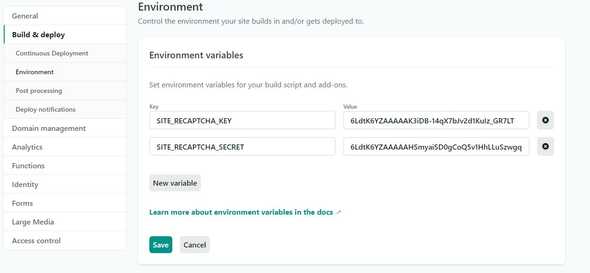
Add site key and secret key to Netlify’s variables
Settings → Build & deploy → Environment
- SITE_RECAPTCHA_KEY: site key
- SITE_RECAPTCHA_SECRET: secret key

Modify source code
-
Install
react-google-recaptchayarn add react-google-recaptcha -
formに
data-netlifyとdata-netlify-recaptchaを追加<form data-netlify="true" data-netlify-recaptcha="true" > ... </form> -
Output site key to
.env.developmentso Gatsby will read it to process.env automatically. (You have to make.env.productionwith the same contents in production build)SITE_RECAPTCHA_KEY=6LdtK6YZAAAAAK3iDB-14qX7bJv2d1KuIz_GR7LT -
Add reCAPTCHA component to form
import ReCAPTCHA from 'react-google-recaptcha'; const [recaptchaValue, setRecaptchaValue] = React.useState(""); const handleChangeReCAPTCHA = React.useCallback((value) => { setRecaptchaValue(value); }, []); <form data-netlify="true" data-netlify-recaptcha="true" > ... <ReCAPTCHA sitekey={process.env.SITE_RECAPTCHA_KEY} onChange={handleChangeReCAPTCHA} /> </form> -
Use
g-recaptcha-responseas parameter name in form data to postfetch("/", { ..., body: { "g-recaptcha-response": encodeURIComponent(recaptchaValue), } }) -
Put all together
import ReCAPTCHA from 'react-google-recaptcha';

function ContactForm() {
  const [inputs, setInputs] = React.useState({});
  const [recaptchaValue, setRecaptchaValue] = React.useState("");
  const handleChange = React.useCallback(
    (event) => {
      setInputs({
        ...inputs,
        [event.target.name]: event.target.value,
      });
    },
    [inputs],
  );
  const handleChangeReCAPTCHA = React.useCallback((value) => {
    setRecaptchaValue(value);
  }, []);

  const handleSubmit = React.useCallback(
    (event) => {
      const submitForm = event.currentTarget;
      event.preventDefault();
      event.stopPropagation();
      if (recaptchaValue != null && recaptchaValue !== "") {
        fetch("/", {
          method: "POST",
          headers: { "Content-Type": "application/x-www-form-urlencoded" },
          body: encodeObj({
            "form-name": "form1",
            "g-recaptcha-response": recaptchaValue,
            ...inputs,
          }),
        })
          .catch(() => console.log('POST ERROR'));
      }
    },
    [inputs, recaptchaValue],
  );

  return (
    <form
      data-netlify="true"
      data-netlify-recaptcha="true"
      onSubmit={handleSubmit}
    >
      {/* You still need to add the hidden input with the form name to your JSX form */}
      <input type="hidden" name="form-name" value="form1" />
      <p hidden>
        <label htmlFor="bot-field">
          Don’t fill this out: <input name="bot-field" onChange={handleChange} />
        </label>
      </p>
      <p>
        <label>Email: <input type="text" name="email" /></label>
      </p>
      <p>
        <label>Message: <textarea name="message"></textarea></label>
      </p>
      <p>
        <button type="submit">Send</button>
      </p>
    </form>
  );
}

